Setting Up WireGuard on Your VPS
WireGuard is a modern VPN protocol built directly into the Linux kernel since version 5.6, with client applications for Windows, macOS, Linux, iOS, Android and others.
It is simpler to configure than OpenVPN or IPsec, uses state-of-the-art cryptography, and offers significantly better throughput.
This guide sets up a WireGuard server on a SkylonHost VPS running Ubuntu 26.04 and generates a client configuration to use the VPN from your local machine or mobile device. Ubuntu 24.04 and Debian 13 are also supported with no differences in the process.
Prerequisites
You will need:
- A SkylonHost VPS running Ubuntu 26.04
We recommend the Ryzen series if you are planning on running high-bandwidth applications. - Root or
sudoaccess to your server - WireGuard installed on your client device
1. Deploy a new SkylonHost instance
WireGuard is a CPU intensive application, so we recommend using a VPS with at least 2 CPU cores for higher traffic applications. For a personal use case, a single CPU core should be sufficient however.
You can deploy a new instance from the SkylonHost control panel, and select Ubuntu 26.04 as the operating system.
After the 60 second deployment process finishes, you can proceed by logging into your server via SSH. The default username is root, and the password is displayed in the control panel - or you can use an SSH key if you have selected one during deployment.
2. Prepare the server and install WireGuard
The first step is to prepare the server by changing the root password, upgrading all packages and rebooting, as the template might be out-of-date.
You can change the root password by using the passwd command.
root@myvpn:~# passwd root
New password:
Retype new password:
passwd: password updated successfully
The following commands update the package lists (apt update) and upgrade all packages (apt upgrade -y), then reboot the server to apply any kernel updates.
apt update && apt upgrade -y
reboot
After the reboot finishes and we log back in, we can install WireGuard. The package is included in the default Ubuntu repositories, so installation is straightforward.
apt install -y wireguard wireguard-tools3. Generate Server Keys
Create a private/public key pair for the server. Keep the private key safe and do not copy it anywhere.
wg genkey | tee /etc/wireguard/server_private.key | wg pubkey | tee /etc/wireguard/server_public.key
chmod 600 /etc/wireguard/server_private.key
4. Generate Client Keys
Repeat the same process for the client:
mkdir -p /etc/wireguard/clients
pushd /etc/wireguard/clients
wg genkey | tee client1_private.key | wg pubkey > client1_public.key
popd
5. Create the Server Configuration
The following code creates a WireGuard configuration file for the server at /etc/wireguard/wg0.conf. If you are using a SkylonHost instance, the primary network interface is typically eno1. You can double check the name of your network interface by running ip addr and looking for the interface with the public IP address assigned to it, if it differs, make sure to replace eno1 with the correct interface name in the configuration below.
cat <<EOF > /etc/wireguard/wg0.conf
[Interface]
Address = 10.0.0.1/24
ListenPort = 51820
PrivateKey = `cat /etc/wireguard/server_private.key`

# Enable IP forwarding and NAT so clients can reach the internet
PostUp = iptables -A FORWARD -i wg0 -j ACCEPT; \
    iptables -t nat -A POSTROUTING -o eno1 -j MASQUERADE; \
    iptables -t nat -A PREROUTING -i eno1 -p udp -m udp --dport 443 -j REDIRECT --to-ports 51820; \
    iptables -t mangle -A FORWARD -p tcp -m tcp --tcp-flags SYN,RST SYN -m comment --comment MSSCLAMP -j TCPMSS --set-mss 1300

PostDown = iptables -D FORWARD -i wg0 -j ACCEPT; \
    iptables -t nat -D POSTROUTING -o eno1 -j MASQUERADE; \
    iptables -t nat -D PREROUTING -i eno1 -p udp -m udp --dport 443 -j REDIRECT --to-ports 51820; \
    iptables -t mangle -D FORWARD -p tcp -m tcp --tcp-flags SYN,RST SYN -m comment --comment MSSCLAMP -j TCPMSS --set-mss 1300

[Peer]
PublicKey = `cat /etc/wireguard/clients/client1_public.key`
AllowedIPs = 10.0.0.2/32
EOF
Let's break it down. The [Interface] pertains to the server, while the [Peer] section is for the client. Each new client will have a new [Peer] section with an incremented IP address (e.g. 10.0.0.3/32).
The PostUp and PostDown commands are used to configure the IPTables firewall accordingly.
iptables -A FORWARD -i wg0 -j ACCEPT
This line allows traffic incoming from the WireGuard interface to be forwarded to the internet.iptables -t nat -A POSTROUTING -o eno1 -j MASQUERADE
This line enables SNAT to rewrite the client traffic to be sourced with the server's public IP address.iptables -t nat -A PREROUTING -i eno1 -p udp -m udp --dport 443 -j REDIRECT --to-ports 51820
This line redirects incoming traffic on port 443 to the WireGuard port (51820). It effectively allows WireGuard to run on port 443 as well, which is useful for bypassing firewalls that block non-standard ports.iptables -t mangle -A FORWARD -p tcp -m tcp --tcp-flags SYN,RST SYN -m comment --comment MSSCLAMP -j TCPMSS --set-mss 1300
This line clamps the maximum segment size (MSS) for TCP connections to 1300 bytes, which is required in order to avoid fragmentation issues within the VPN tunnel. Typical symptom of fragmentation issues include secured connections failing, such as HTTPS websites not loading, while plaintext HTTP usually works.
6. Enable IP Forwarding
Our server will become a router between the VPN clients and the internet, so we need to allow IP forwarding in the kernel:
echo "net.ipv4.ip_forward=1" > /etc/sysctl.d/99-wireguard.conf
sysctl --system
7. Start and Enable WireGuard
systemctl enable --now wg-quick@wg0Verify the interface is up. We should see output similar to the following:
root@myvpn:~# wg show
interface: wg0
  public key: nl+/Mh6LYVGZZmLT/QrNDzufhPajnGajAcdZXlBUwXo=
  private key: (hidden)
  listening port: 51820

peer: tyUNeF+/bF6VzHlTMANiAbyu8lXMWEgzc7yigGaTJS8=
  allowed ips: 10.0.0.2/32
8. Configure the Client
On the client device, create the following configuration. Replace the placeholder values with your actual keys and the public IP address of your VPS.
CLIENT_PRIVATE_KEY: The private key generated for the client.
Contents of/etc/wireguard/clients/client1_private.keySERVER_PUBLIC_KEY: The public key generated for the server.
Contents of/etc/wireguard/server_public.keyYOUR_VPS_IP: The public IP address of your SkylonHost VPS.
[Interface]
Address = 10.0.0.2/24
PrivateKey = CLIENT_PRIVATE_KEY
DNS = 8.8.8.8, 1.1.1.1

[Peer]
PublicKey = SERVER_PUBLIC_KEY
Endpoint = YOUR_VPS_IP:51820
AllowedIPs = 0.0.0.0/0, 8000::/1, ::/1 # route all traffic through the VPN
PersistentKeepalive = 15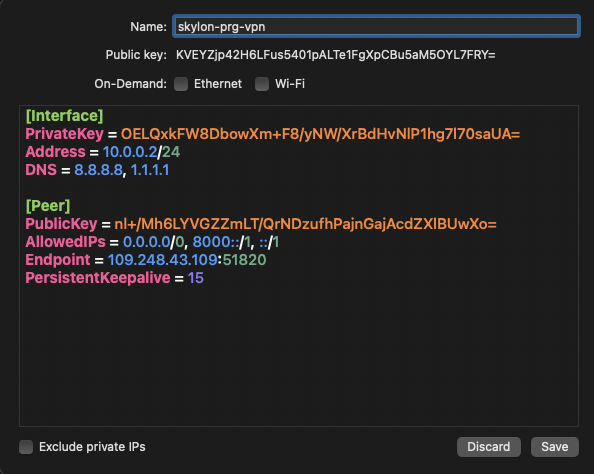
If you are behind a restrictive firewall that blocks port 51820/udp, you can try changing the port to 443 instead.
10. Connect and Test
Activate the tunnel on the client
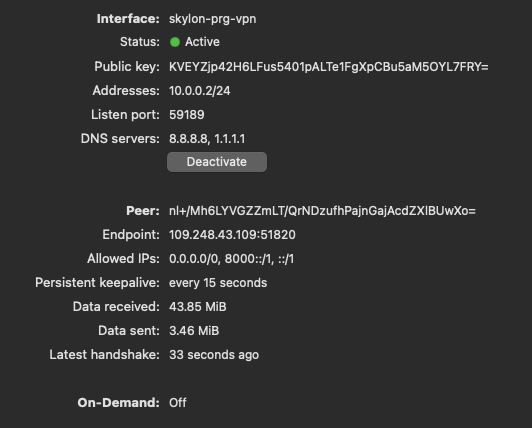
Check your public IP from the client, for example by opening https://ipinfo.io/what-is-my-ip in a web browser. It should now show the public IP of your VPS, indicating that your traffic is being routed through the VPN.
11. Adding More Clients
For each additional client, generate a new key pair and add a new [Peer]block to /etc/wireguard/wg0.conf, assigning it the next available address (e.g. 10.0.0.3/32). Then reload the interface:
wg addconf wg0 <(wg-quick strip wg0)